Why the “Right” Hook Matters More Than You Think
A crochet hook isn’t just a tool that holds yarn—it’s a mechanical interface between your hands, the fiber, and the stitch structure you’re building. Two crocheters can follow the same pattern with the same yarn and end up with different fabrics because hook choice affects:
- Gauge (stitches and rows per inch/cm)
- Drape (how fluid or stiff the fabric feels)
- Tension consistency (especially for beginners or stressed hands)
- Speed and comfort (fatigue, cramping, repetitive strain)
- Stitch definition (how “crisp” the loops look)
- Splitting and snagging (especially with plied, silky, or novelty yarns)
In other words: if your amigurumi looks floppy, your shawl feels cardboard-stiff, or your hands hurt after 20 minutes, the issue may be the hook as much as the yarn or your technique.
This guide breaks down hook materials, shapes, sizing, ergonomics, and practical matching strategies—plus pattern examples and troubleshooting.
1) Crochet Hook Materials: How They Affect Yarn Flow and Control
Hook material determines friction, weight, temperature, and feedback (how much you can “feel” the yarn). Those properties change how easily loops slide and how tightly you tend to hold the yarn.
Aluminum (and other metal hooks)
Best for: most yarns, speed, consistent stitch formation
What it feels like: smooth, cool, light-to-moderate weight. Loops glide easily, which can make your crochet faster.
Pros
- Great slip for acrylic, wool, and many blends
- Durable and widely available
- Often the easiest for learning because stitches don’t stick
Cons
- Can be too slippery for very smooth yarns (bamboo, silk, some mercerized cotton)
- Some people tense up to “control” the glide, leading to hand fatigue
Tip: If you find your tension getting looser on aluminum, try going down 0.25–0.5 mm, or switch to a slightly grippier material for the same size.
Stainless steel (micro hooks)
Best for: thread crochet, lace, doilies, micro-amigurumi
Very smooth and stiff, typically used in small sizes. Because thread has less “give,” a strong, precise hook helps prevent distortion.
Plastic
Best for: chunky yarns, beginners who prefer warmer tools, budget-friendly sets
Pros
- Warmer feel than metal
- Often inexpensive and lightweight
Cons
- Some plastic hooks have mold seams that snag yarn
- Can flex under tension in larger sizes, changing stitch consistency
Tip: Run your fingertip along the hook head and shaft—if you feel a ridge, it can catch on splitty yarn. Fine sandpaper (very lightly) can sometimes smooth it, but test carefully.
Wood and bamboo
Best for: slippery yarns, relaxed pace projects, people who like more control
What it feels like: warm, slightly grippy, often very pleasant in the hand.
Pros
- Helps prevent stitches sliding off accidentally
- Excellent for very slick fibers (silk, rayon, some mercerized cotton)
- Warm and comfortable for long sessions
Cons
- The grip can slow you down
- Can snag if the hook tip is not perfectly finished
- May break in very small diameters or under high tension
Tip: Bamboo/wood hooks often shine for laceweight where you want control, but if your stitches feel tight and hard to draw through, switch to a smoother hook or size up.
Resin and acrylic (the “pretty” hooks)
Best for: medium sizes, style + comfort, those who like moderate slip
These can be wonderfully smooth and warm, but quality varies widely. Look for a cleanly finished hook throat and head.
Specialty coated metal (e.g., anodized, polymer-coated)
Best for: balanced slip, color-coded sizing, reduced squeak
Coatings can reduce drag and sometimes reduce squeaking with certain fibers (notably some acrylics).
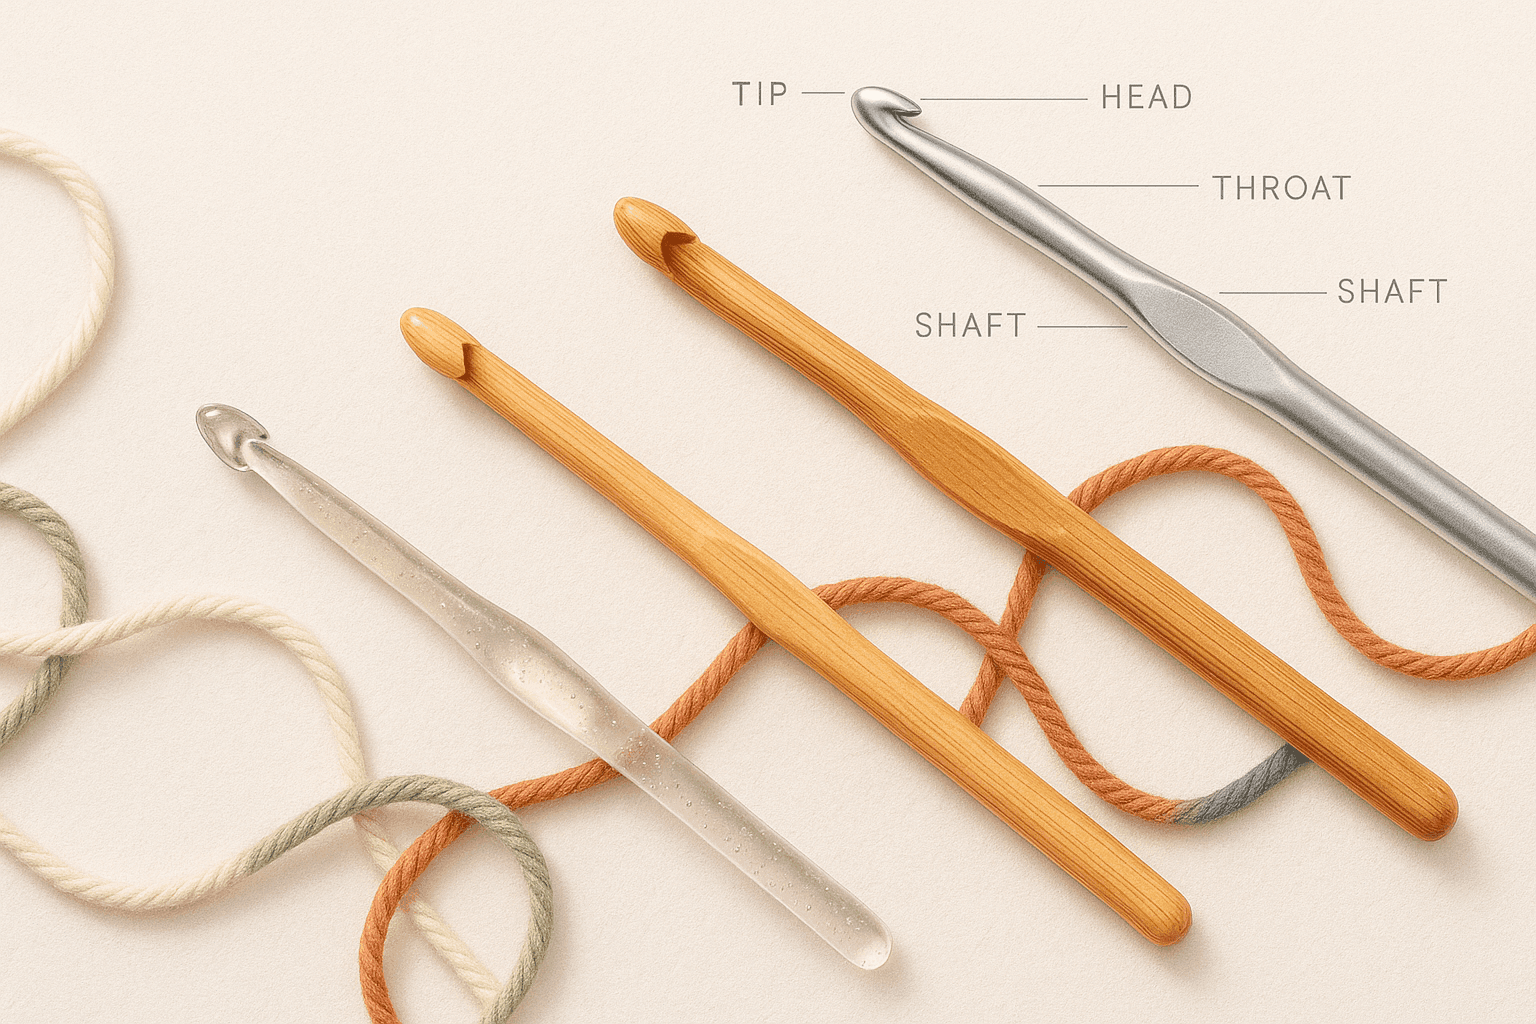
2) Hook Anatomy and Shape: Head, Throat, Shaft, and Handle
Two hooks labeled the same size can behave differently because of geometry.
Key parts of a hook
- Tip/point: how sharp or rounded the very end is
- Head: the “scoop” that catches yarn
- Throat (neck): the narrow section under the head where loops travel
- Shaft: the cylindrical section that determines actual loop size (and thus gauge)
- Handle/grip: where you hold the hook
Inline vs tapered hooks
This distinction is huge for stitch mechanics.
Inline hooks (head aligns more “in line” with shaft; often a deeper, squarer throat)
- Pros: more consistent loop sizing; great for uniform tension and beginners who struggle with uneven stitches
- Cons: can feel “catchy” or slower for some crocheters; may split yarn if the tip is too pointy for the yarn type
Tapered hooks (gradual narrowing near the head)
- Pros: faster for many people; smoother entry into stitches; often great for amigurumi tight stitching
- Cons: loop size can vary more depending on where on the taper you hold tension; may lead to subtle gauge drift
Practical choice:
- If your stitches are uneven: try inline.
- If you want speed and flow: try tapered.
Hook head shape and yarn splitting
- A sharper tip can enter tight stitches more easily (great for dense fabrics) but may split plied yarn.
- A rounder tip reduces splitting but can be harder to insert into tight stitch tops.
Yarn structure matters:
- High-twist plied yarn (e.g., many sock yarns) resists splitting.
- Low-twist single ply (common in roving-style wools) can pill and fuzz if the hook is too sharp or rough.
- Chainette construction (tube-like) can snag on rough throats.
Throat depth and “grab”
A deeper throat holds the yarn loop securely, which can help beginners who drop loops mid-stitch. Shallow throats can feel faster but less secure.
3) Hook Size: Gauge, Fabric Density, and Pattern Intent
Hook size is not just about “what the label says.” It’s about the relationship between hook diameter, yarn thickness, and your tension.
Standard sizing systems (and why they’re confusing)
Hooks may be labeled in:
- Millimeters (mm): most precise
- Letter sizes (US): e.g., H/8, J/10
- UK sizes (older systems)
Because letters can vary by brand, mm is your safest reference.
The golden rule: the pattern’s hook size is a starting point
Designers choose a hook size to achieve a specific fabric: drapey for shawls, dense for amigurumi, structured for baskets. Your job is to hit the target gauge, not worship the suggested hook.
How hook size changes fabric
- Smaller hook → tighter stitches, denser fabric, more structure, less drape
- Larger hook → looser stitches, more drape, bigger holes, faster growth
Pattern examples: matching hook size to purpose
Amigurumi (tight, firm fabric)
- Yarn: worsted (#4)
- Common hook: 2.75–3.5 mm (often smaller than yarn label suggests)
- Goal: stitches close enough that stuffing doesn’t show
Tip: Choose a hook that lets you single crochet comfortably without wrist strain. If you must fight every pull-through, you’re too small or gripping too hard.
Wearables (drape and comfort)
- Yarn: DK to worsted
- Common hooks: 4.0–6.0 mm, depending on stitch pattern
- Goal: fabric that moves with the body
Tip: Lace or openwork typically needs more size to show the motif; dense textured stitches may need a slightly larger hook to avoid stiffness.
Home decor (structure)
- Baskets, rugs, coasters: often a smaller hook than the yarn suggests for stiffness
- Filet curtains, lacy table runners: often a larger hook to open the grid
4) Ergonomics and Handle Styles: Protecting Your Hands
Crochet is joyful until pain shows up. Hook ergonomics can reduce strain by improving your grip and letting muscles relax.
Common grip styles
- Pencil grip: hook held like a pencil; often prefers slimmer handles
- Knife grip: hook held like a butter knife; often benefits from thicker ergonomic handles
Neither is “more correct.” The right hook supports your grip without forcing it.
Handle thickness and material
- Thicker handles reduce pinch force (good for arthritis, hypermobility, tendinitis)
- Softer grips can feel comfortable but sometimes increase sweating and drag
- Firm ergonomic grips (silicone, rubberized) stabilize the hand
Weight and balance
- Heavier hooks can reduce death-grip for some people (the tool does the work), but may fatigue others.
- Lighter hooks reduce overall load but may lead to gripping harder for control.
Practical test: Crochet a 10–15 minute swatch. If your thumb/index finger joints ache, you likely need a thicker grip or a different balance.
5) Matching Hook to Yarn: A Fiber-Forward Approach
Yarn labels provide suggested hook sizes, but fiber artists benefit from understanding why.
Consider the yarn’s fiber properties
- Elasticity: Wool is springy; cotton is not. Elastic yarns tolerate tighter tension; inelastic yarns can hurt your hands if too tight.
- Surface: Smooth fibers slide; haloed fibers (mohair, alpaca) grip and felt.
- Strength: Some delicate fibers can abrade with rough hooks.
Quick pairing guide
- Cotton (mercerized or not): often pairs well with aluminum or coated metal for smooth pull-through; bamboo can feel grabby.
- Wool (non-superwash): many enjoy wood/bamboo for gentle control; metal for speed.
- Superwash wool: smoother; may benefit from slightly grippier hook if stitches feel too loose.
- Acrylic: usually great with aluminum; can squeak on some plastics.
- Mohair/halo yarns: smoother hooks reduce snagging; avoid sharp tips that catch fuzz.
- Ribbon/tape yarn: larger hook with a smooth throat; avoid sharp points that split the tape.
Yarn ply and splitting
If your yarn splits constantly:
- Try a rounder-tipped hook.
- Switch to a tapered head if your inline hook feels too “knife-like.”
- Adjust technique: insert under both loops cleanly; slow down on pull-through.
6) Hook Choice by Stitch Pattern: Mechanics Matter
Different stitches stress different parts of the hook.
Single crochet (US) / double crochet (UK)
- Dense, repetitive, lots of insertion into stitch tops.
- A hook with a comfortable throat and a tip that isn’t overly sharp helps prevent splitting.
Half double crochet and double crochet (US)
- More yarn overs and pull-throughs.
- Smoothness in the throat matters; if your hook drags, tall stitches feel frustrating.
Slip stitch crochet (and dense fabrics like waistcoat stitch)
- Very tight stitch anatomy; insertion is difficult.
- A slightly sharper tip can help, but too sharp can split.
- Often worth sizing up 0.25–1.0 mm to preserve sanity and prevent hand strain.
Lace (chains, tall stitches, clusters)
- Needs consistent loop sizing and fluid yarn movement.
- Many crocheters prefer metal hooks for speed and clean yarn overs.
Tunisian crochet (if using Tunisian hooks)
- The hook acts like a hybrid between crochet and knitting.
- Cable length, hook smoothness, and shaft consistency matter.
7) Practical Pattern Mini-Examples (How Hook Choice Changes Results)
These aren’t full patterns—think of them as diagnostic swatches you can use to test hook/yarn combos.
A) Drape Swatch for Wearables
Goal: choose hook size for a shawl or top.
- Chain 26.
- Row 1: dc in 4th ch from hook and across.
- Row 2–10: ch 3, dc across.
Make the swatch with two hook sizes (e.g., 4.5 mm and 5.5 mm).
Evaluate:
- Does the fabric hang or stand stiff?
- Do the stitches look balanced (not elongated, not cramped)?
- Does it feel good against skin?
B) Density Swatch for Amigurumi
Goal: ensure stuffing won’t show.
- Magic ring, 6 sc.
- Increase each round until 36 sc.
- Work 3 rounds even.
Try with 3.0 mm and 3.5 mm.
Evaluate:
- Stretch the fabric slightly—do gaps appear?
- Is it painful to crochet? (If yes, size up or change hook type.)
C) Splitty Yarn Test Swatch
Goal: determine whether splitting is hook- or yarn-driven.
- Make 20 foundation chains.
- Work 6 rows of sc.
Try a sharper inline hook vs a rounder tapered hook.
Evaluate:
- Count how often you split a ply.
- Look at fuzzing: is the yarn surface getting roughed up?
8) Troubleshooting: Common Problems and Hook-Based Fixes
Problem: My gauge is off even though I’m “using the right hook size.”
Likely causes: your tension differs from the designer’s; hook geometry differs; yarn differs.
Fixes:
- Swatch and adjust hook size in 0.25–0.5 mm increments.
- If you own multiple brands, try a different hook style (inline vs tapered) in the same mm—geometry can subtly change loop formation.
Problem: My hands hurt or cramp quickly.
Likely causes: excessive pinch grip, too-small handle, inelastic yarn at tight tension.
Fixes:
- Try an ergonomic thicker handle.
- Use a slightly larger hook and adjust pattern or gauge.
- For cotton projects: consider a smoother hook to reduce force on pull-through.
- Check posture: forearms supported, shoulders relaxed.
Problem: Stitches keep slipping off the hook.
Likely causes: very smooth yarn + very smooth hook; shallow throat; tension too loose.
Fixes:
- Switch to wood/bamboo or a hook with a deeper throat.
- Try a slightly smaller size.
Problem: Yarn squeaks.
Likely causes: friction between fiber and hook coating (common with some acrylics).
Fixes:
- Try a different material (anodized aluminum often squeaks less than some plastics).
- Wash hands and hook—oils can increase squeak.
Problem: The hook snags and makes my yarn fuzzy.
Likely causes: rough seam, damaged head, sharp tip, abrasive coating.
Fixes:
- Inspect the hook under bright light; feel for burrs.
- Replace the hook if damaged.
- For delicate fibers: choose a smoother, well-finished hook.
Problem: My stitches look uneven.
Likely causes: inconsistent loop height; tension changes; tapered shaft variability.
Fixes:
- Try an inline hook for more uniform loop sizing.
- Practice pulling loops to the shaft (not the taper) before completing the stitch.
9) Building a Smart Hook Toolkit (Without Buying Everything)
It’s tempting to collect hooks endlessly. A practical toolkit covers most needs:
Core set for yarn crochet
- 3.5 mm
- 4.0 mm
- 4.5 mm
- 5.0 mm
- 5.5 mm
- 6.0 mm
Add:
- 2.75–3.25 mm (amigurumi, tight gauge)
- 6.5–8.0 mm (chunky)
Thread crochet / lace add-ons
- Steel hooks from ~0.6 mm to 1.75 mm depending on your thread weight
Ergonomic backup
Even if you prefer plain aluminum, having one ergonomic handle in your most-used size can save your hands on marathon projects.
Mixing brands intentionally
One brand might have your favorite 4.0 mm but a disappointing 6.0 mm. It’s normal to mix:
- A smooth, fast hook for lace
- A grippier hook for slippery yarn
- A rounded tip hook for splitty fibers
10) Expert-Adjacent Principles: What Designers and Tech Editors Think About
While individual preferences vary, experienced designers and technical editors often emphasize:
- Gauge swatching as a design control tool (not a chore)
- Fabric intent: hook size is chosen to create a specific textile, not just match yarn thickness
- Consistency: hook geometry should support repeatable loop sizing
If you follow designer notes, you’ll often see clues like “go up a hook size for drape” or “use a smaller hook for a firm fabric.” Treat those as fabric-engineering directions.
11) A Simple Decision Framework (Use This Before Starting Any Project)
When you’re choosing a hook, run this checklist:
- Project goal: drape (wearable) or structure (amigurumi/basket)?
- Yarn behavior: slippery or grabby? splitty? elastic or inelastic?
- Your comfort: do your hands prefer thicker handles or lighter hooks?
- Stitch pattern: dense (sc) or tall/open (dc, lace)?
- Swatch: make a small test and measure gauge + feel.
Then decide:
- Adjust size to hit gauge/fabric.
- Adjust material/shape to improve comfort and reduce splitting.
12) Final Takeaways
The “best” crochet hook is the one that helps you produce the fabric you want with comfort and control. Hook choice is a blend of physics (friction and diameter), geometry (head and throat shape), and ergonomics (how your body holds tension).
If you remember only three things:
- Hook size sets fabric density—swatch and adjust.
- Hook shape changes stitch consistency and splitting—inline vs tapered matters.
- Comfort is part of craftsmanship—ergonomics is not a luxury.
When you start treating hooks as part of your design toolkit (not just a required accessory), your crochet becomes more predictable, more enjoyable, and more yours.