Why crochet colorwork is worth learning
Colorwork is one of the fastest ways to make crochet look “designer.” A simple stitch pattern—single crochet, half double crochet, double crochet—can become striking when you introduce deliberate color placement. Beyond aesthetics, colorwork teaches foundational skills that improve everything you make: consistent tension, yarn management, reading charts, planning gauge, and understanding stitch mechanics.
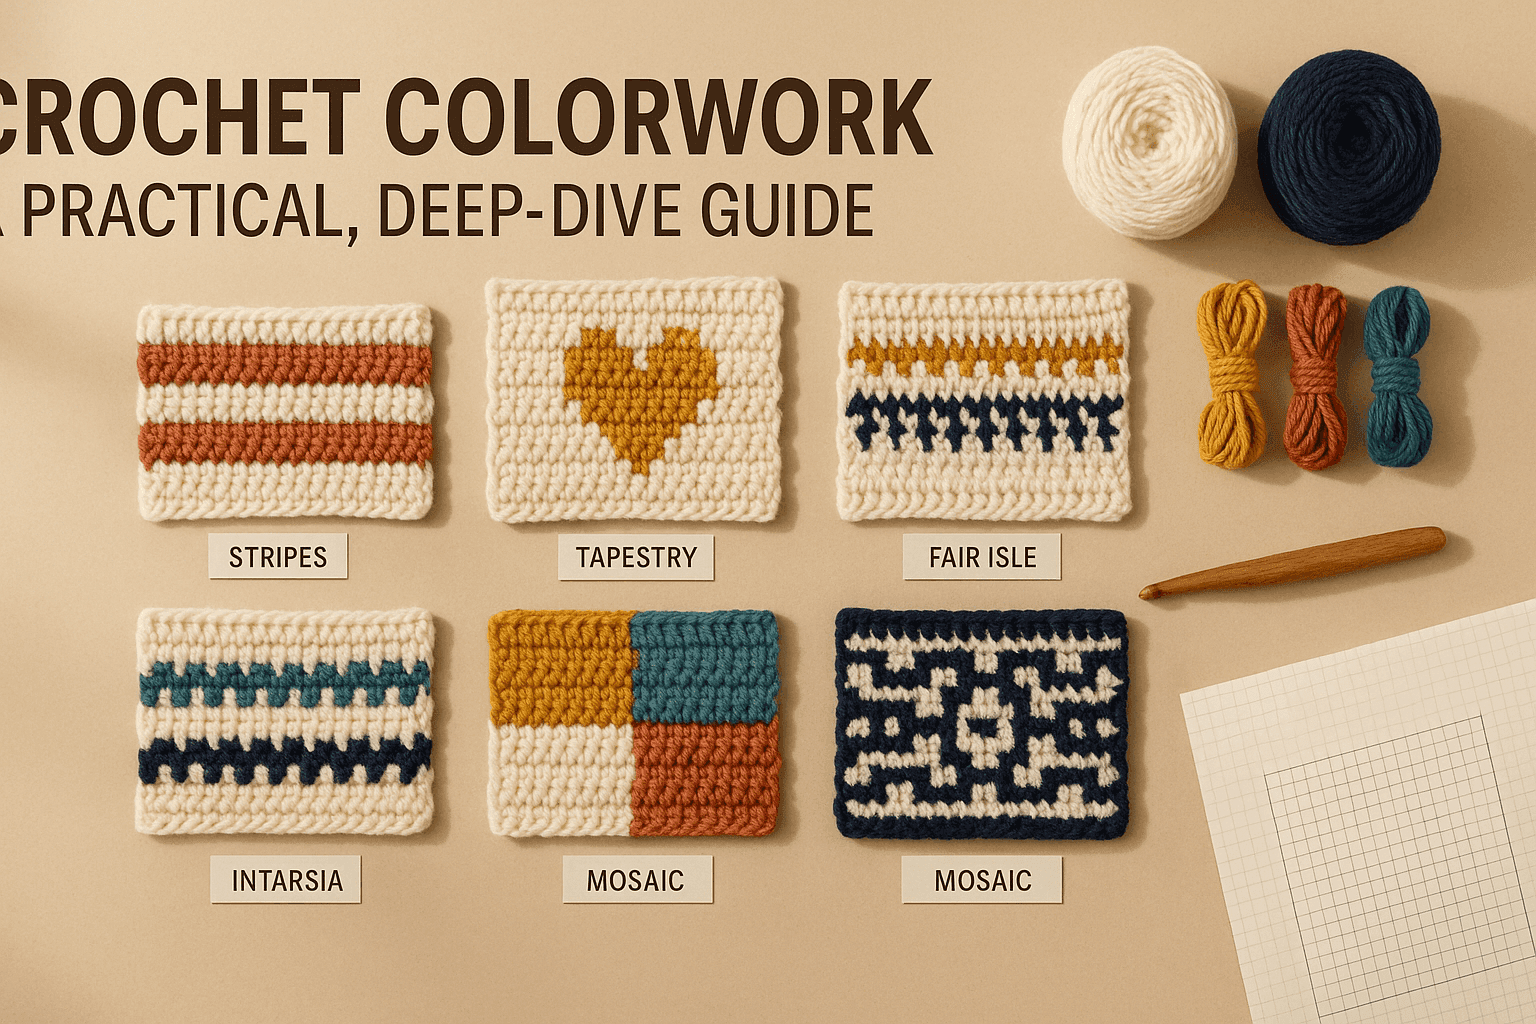
This guide focuses on the most common crochet colorwork approaches—stripes, tapestry crochet, Fair Isle/stranded crochet, intarsia, and mosaic crochet—with practical tips, yarn advice, pattern examples, and troubleshooting. You’ll also learn how color behaves in crochet (it’s not identical to knitting), so you can plan projects that look crisp and intentional.
How crochet stitches affect color (the “why” behind the look)
Before choosing a technique, it helps to understand what the stitches are doing.
Stitch anatomy: why crochet pixels look different than knitting
Most crochet stitches are built from loops stacked on top of each other, with a horizontal bar and a front/back “post” element depending on stitch type. In single crochet (sc), you effectively get a compact, square-ish unit that behaves like a pixel—excellent for charted colorwork (tapestry, some Fair Isle).
In taller stitches like double crochet (dc), the stitch has more vertical stretch and negative space. Color changes read more like painted brush strokes than pixels—great for stripes, gradients, and modern graphic motifs, but less crisp for small details.
The “jog” in rounds
When you work in a continuous spiral (common in amigurumi), color changes form a diagonal step called a jog. It’s not a mistake; it’s structural. You can reduce it with jogless change techniques, but you can’t make it disappear entirely without changing construction (e.g., joined rounds or back-and-forth rows).
Crochet fabric thickness and color dominance
Crochet is often thicker than knitting. That thickness can intensify color contrast, but it also means carried yarn can show through more easily (especially with light colors over dark). You’ll manage this with yarn choice, tension, and technique.
Yarn and hook choices for clean colorwork
Colorwork succeeds or fails based on yarn behavior and your ability to maintain consistent tension.
Fiber properties that matter
- Wool / wool blends: Grippy, elastic, forgiving. Great for stranded/Fair Isle, tapestry, mosaic. Blocks beautifully.
- Cotton: Crisp stitch definition, less stretch, can feel heavy. Great for tapestry and mosaic, but requires careful tension to prevent puckering.
- Acrylic: Smooth and affordable; can be slightly splitty in some brands. Excellent for practice and for items needing easy care.
- Silk/alpaca: Gorgeous drape, but less stitch “lock.” Not ideal for high-contrast pixel motifs unless you have excellent tension control.
Yarn structure
- Plied yarns (multiple plies twisted): tend to give cleaner stitch edges.
- Single-ply: can look soft and painterly, but color edges blur more.
Recommended yarn weights
- DK / Worsted (Category 3–4): easiest to learn on; motifs show clearly.
- Sport / Fingering: beautiful for detailed charts, but requires more patience and yarn management.
Hook sizing
A common rule in tapestry and stranded crochet: go down 0.25–1.0 mm from what you’d use for that yarn normally. A slightly smaller hook tightens the fabric and reduces “show-through” of carried yarn.
However, going too small can make the fabric stiff and cause hand fatigue. Aim for a fabric that’s firm but still pliable.
Technique 1: Stripes (the gateway to colorwork)
Stripes seem simple—and they are—but mastering clean transitions teaches nearly every colorwork skill.
Best use cases
- Blankets, scarves, hats
- Simple garments where fit matters
- Projects where you want bold color blocks without charts
Clean stripe color changes (rows)
For back-and-forth rows:
- Work the last stitch of the old color until you have the final yarn over left.
- Yarn over with the new color and pull through to finish the stitch.
- Continue in the new color.
This places the color change exactly at the edge of the row, creating a neat line.
Clean stripe color changes (joined rounds)
If you join each round with a slip stitch:
- Change color on the final yarn over of the last stitch of the round.
- Join with slip stitch using the new color.
- Chain as needed and begin the next round.
Jogless stripes in continuous rounds
If you crochet spirals (common in hats worked top-down or amigurumi):
- Consider switching to joined rounds for cleaner stripes.
- Or use a jogless technique: after changing color, slip stitch in the next stitch, then single crochet in the following stitch (varies by pattern). Expect a slight shift rather than a perfect line.
Stripe pattern example (beginner-friendly)
“Rhythm Stripe Cowl” concept
- Stitch: half double crochet in the back loop (hdc blo) for subtle texture.
- Colors: 3 colors (A, B, C).
- Repeat: 4 rounds A, 2 rounds B, 2 rounds C.
- Tip: in blo, the ridge emphasizes stripe separation.
Technique 2: Tapestry crochet (carrying yarn inside the stitches)
Tapestry crochet is the classic “pixel art” method: you change colors frequently and carry the non-working yarn along, crocheting over it.
Best use cases
- Bags, baskets, slippers, pillows
- Dense items where you want a sturdy fabric
- Chart-based motifs (geometric, pictorial, lettering)
Core method (single crochet tapestry)
- Work primarily in single crochet (sc).
- Keep the non-working yarn inside the fabric by laying it along the top of the row and stitching over it.
- Change color on the last yarn over of the stitch before the new color begins.
Practical tension rule
Tapestry tension has two parts:
- Stitch tension (your working yarn)
- Carry tension (the yarn you crochet over)
If the carry is too tight, your fabric puckers. If it’s too loose, the carried yarn can “bubble” and show through.
A good habit: every few stitches, gently stretch your work horizontally to ensure the carry isn’t strangling the fabric.
Managing show-through (“shadowing”)
Show-through happens when the carried yarn peeks through gaps.
To reduce it:
- Use a smaller hook.
- Choose colors with similar depth (avoid carrying black under white if possible).
- Try yarn under instead of yarn over for single crochet (common in amigurumi). Yarn-under can create tighter, more square stitches.
- Make sure the carried yarn sits consistently either on the wrong side or fully embedded.
Reading tapestry charts
Charts are usually read:
- Right-to-left on right-side rows
- Left-to-right on wrong-side rows (if turning)
In the round, you typically read continuously in one direction.
Important: crochet stitches are not perfectly square; they can be slightly wider than tall. If your motif looks stretched, adjust:
- Hook size
- Stitch choice (waistcoat stitch for a more knit-like square)
- Chart scaling (wider motifs)
Pattern example (intermediate)
“Two-Color Diamond Tote” concept
- Base: oval in single crochet
- Body: tapestry sc in the round, 2 colors
- Handles: reinforced single crochet with slip stitch edge
- Tip: line the bag to hide floats and improve durability.
Technique 3: Stranded crochet / “Fair Isle” style (carrying floats behind)
In crochet, “Fair Isle” is often used loosely to mean stranded colorwork, but traditional Fair Isle is a knitting technique with specific rules. In crochet, stranded colorwork typically means you carry one or more colors across the back as floats rather than crocheting over them.
Best use cases
- Yokes, cuffs, hats
- Motifs with small repeating color changes
- When you want the front to be clean and the back can have floats
Pros and cons
Pros
- Less bulk on the front than tapestry (because you’re not trapping yarn inside each stitch)
- Can look crisp if floats are managed well
Cons
- Floats can snag
- Tension is harder: floats must be long enough not to pucker, short enough not to loop
Managing floats
A common guideline (borrowed from knitting logic): don’t leave floats longer than about 3–5 stitches without catching them.
To “catch” a float in crochet:
- Lay the float yarn over the working yarn at the back of the work for one stitch, then continue. The float becomes lightly anchored.
This is subtle but can slightly show through on the front—test with high contrast.
Yarn recommendation
Wool or wool blends excel here because the elasticity helps even out tension. Acrylic can work, but very smooth acrylic can make floats slip and distort.
Pattern example
“Nordic Band Beanie” concept
- Base ribbing: single crochet in back loop, join to form a band
- Body: single crochet in the round with a repeating stranded motif band
- Crown decreases: keep motifs simple near top to avoid messy shaping
Technique 4: Intarsia crochet (separate color blocks, no carrying across)
Intarsia is ideal when you have large color blocks with clean boundaries—think hearts, large letters, big geometric panels.
Instead of carrying yarn across the row, each color area uses its own yarn source (bobbin, butterfly, small ball).
Best use cases
- Wall hangings, blankets with big shapes
- Sweaters with large graphic panels
- When you want a clean wrong side (or you’ll line it)
How it works (in rows)
- Work to the color change.
- Drop old color.
- Join new color and continue.
- At the boundary between colors, you twist yarns (or overlap) to avoid holes.
In crochet, a common approach is to bring the new color under the old color at the change, which locks the edge.
Bobbin management tips
- Use yarn butterflies (wrap a small amount of yarn around your fingers into a figure-eight bundle).
- Clip bobbins to the project with small binder clips.
- Work on a flat surface to prevent tangling.
Intarsia in the round (advanced)
True intarsia in the round is tricky because rounds don’t naturally allow separate blocks without cutting yarn or using special constructions (like working back and forth in rounds or using steeking-like concepts). Many crocheters choose:
- Work flat panels intarsia-style and seam.
- Or use tapestry instead.
Pattern example
“Big Letter Cushion Front” concept
- Front panel: intarsia single crochet chart for a large initial
- Back panel: solid color with envelope closure
- Finish: join panels with slip stitch seam for a framed edge
Technique 5: Mosaic crochet (dramatic patterns with simple stitches)
Mosaic crochet creates intricate, geometric designs using only one color per row/round. The pattern emerges by combining:
- Single crochet (sc) worked in the back loop
- Double crochet (dc) worked into the front loop of the row below (often called a mosaic dc)
This produces a woven, tiled effect with bold contrast and strong texture.
Best use cases
- Blankets, shawls, pillows
- Bags and rugs (with durable yarn)
- High-contrast graphic designs
Why it’s beginner-friendly
Even complex charts are approachable because:
- You only handle one yarn at a time.
- Color changes happen at row ends.
Two main constructions
- Overlay mosaic (most common): creates a dense, textured fabric.
- Inset mosaic: different look, often uses chains/spaces; less common in basic crochet circles.
Edge finishing
Mosaic crochet often creates “steps” at edges due to color changes. Common finishes:
- Envelope border: a border that hides tails and creates a clean frame.
- Applied overlay border: decorative and stabilizing.
Pattern example
“Mosaic Tiles Throw” concept
- Two colors (A and B)
- Repeatable chart motif (e.g., 24-stitch repeat)
- Add envelope border in alternating colors
- Tip: choose strongly contrasting colors to make the pattern pop.
Choosing the right colorwork method (quick decision guide)
- Want simple and flexible? → Stripes
- Want pixel-perfect charts and sturdy fabric? → Tapestry crochet
- Want a lighter front with floats behind? → Stranded/Fair Isle style
- Want big shapes with clean blocks and minimal carrying? → Intarsia
- Want intricate geometric designs with one color per row? → Mosaic crochet
Color planning: making palettes work in fiber
Value matters more than hue
“Value” is how light or dark a color is. Two different hues can have the same value (e.g., medium red and medium green) and won’t contrast well in a chart.
Tip: take a photo of your yarn choices and turn it to grayscale. If the motif disappears in grayscale, you likely need stronger value contrast.
High contrast vs low contrast
- High contrast (black/white, navy/cream): crisp motifs, bold geometry.
- Low contrast (two mid-tones): subtle, sophisticated, but details can blur.
Variegated and speckled yarn in colorwork
Variegated yarn can fight with charts because the color changes create “noise.” If you want to use it:
- Pair it with a solid.
- Use it for the background and keep motifs solid (or vice versa).
- Choose mosaic patterns where texture helps organize the visual field.
Practical techniques that improve any colorwork
Weaving in ends: do it strategically
Colorwork can create many ends. Options:
- Weave in as you go every few rows.
- Use an envelope border (especially mosaic) to trap ends inside.
- For tapestry, you can sometimes run tails inside the work by crocheting over them for a few stitches, but still secure them properly.
Keeping edges straight
Wavy edges often come from inconsistent turning chains or tension shifts.
- Use a chainless starting double crochet (stacked sc method) for dc rows.
- In sc colorwork, consider chain 1 doesn’t count as stitch and place the first sc in the same stitch consistently.
- Block your finished piece; many edges improve dramatically after blocking.
Blocking and finishing
- Wool: wet block or steam block (carefully) to even tension.
- Acrylic: steam block lightly (do not touch iron directly to yarn).
- Cotton: wet block and pin; it relaxes well but may take longer to dry.
Troubleshooting: common colorwork problems and fixes
1) Puckering or tight fabric
Causes
- Carry yarn too tight (tapestry/stranded)
- Hook too small
- Tension changes when switching colors
Fixes
- Stretch work periodically to relax carries
- Go up one hook size or loosen grip
- Use yarn bobbins (intarsia) instead of carrying across wide sections
2) Carried yarn showing through (tapestry)
Causes
- High contrast colors
- Loose stitch tension
- Smooth yarn with low grip
Fixes
- Use smaller hook
- Try yarn-under sc
- Adjust technique so carried yarn sits consistently behind or embedded
- Choose closer values for carry yarn or redesign chart to reduce long carry under light stitches
3) Slanted motifs in the round
Cause
- Continuous rounds create a spiral shift
Fixes
- Switch to joined rounds
- Use a jogless change
- Re-chart motif with an intentional offset
4) Holes at color changes (intarsia)
Cause
- Yarns not twisted/locked at boundary
Fix
- Twist yarns at each change (bring new color under old or vice versa consistently)
- Tighten the first stitch after the color change slightly
5) Motif looks squished or stretched
Cause
- Stitch aspect ratio mismatch (crochet stitches aren’t perfect squares)
Fixes
- Adjust hook size to change stitch height/width balance
- Try waistcoat stitch (for knit-like “V” pixels)
- Choose charts designed for crochet or resize chart horizontally
6) Messy color transitions in stripes
Cause
- Changing color at the wrong point in the stitch
Fix
- Always change color on the final yarn over of the stitch before the new color
Skill-building exercises (quick practice projects)
-
Swatch set: 5x5 inches each
- One stripe swatch (hdc)
- One tapestry swatch (sc chart: simple heart)
- One stranded swatch (small repeating motif)
- One intarsia swatch (two big blocks)
- One mosaic swatch (two-color mini chart)
-
Chart reading drill
- Take a simple 10x10 pixel motif and crochet it twice: once flat, once in the round. Note how the round shifts.
-
Tension drill
- In tapestry, purposely carry yarn too tight for 10 stitches, then correct it for 10 stitches. Feel the difference.
Expert references and learning resources (concept-level)
- Craft Yarn Council: standards for yarn weights and hook sizing guidance (helpful when substituting yarn).
- Interweave Crochet and Simply Crochet: frequent articles on mosaic and colorwork techniques.
- Designers known for mosaic and charted crochet often provide excellent technique notes and chart conventions; look for patterns with clear legends and stitch annotations.
(When following any specific designer’s method, prioritize their chart key and stitch placements—mosaic and tapestry conventions can vary.)
Putting it all together: a mini “project planner” checklist
Before you start a colorwork project, answer these:
-
Which technique fits the motif?
- Small repeated chart → tapestry or stranded
- Big shapes → intarsia
- Geometric drama, one color per row → mosaic
-
What yarn behaves best for the goal?
- Need elasticity and forgiving tension → wool blend
- Need crisp stitch definition → cotton (with careful tension)
-
Do I have enough contrast?
- Check palette in grayscale.
-
How will I finish ends and edges?
- Border plan, lining plan, weaving schedule.
-
Have I swatched?
- Especially important for garments and fitted hats.
Final thoughts
Crochet colorwork is less about “being good at color” and more about learning a handful of repeatable habits: change colors on the correct loop, manage carry tension, pick yarns that behave predictably, and choose the right technique for the design. Once those become automatic, charts become relaxing rather than intimidating—and you’ll be able to adapt motifs, invent palettes, and troubleshoot confidently.
If you want the fastest route to impressive results: start with mosaic (one color per row), then move to tapestry for pixel precision, and explore intarsia when you’re ready for large, clean graphics.