Why gauge matters (even when you think it doesn’t)
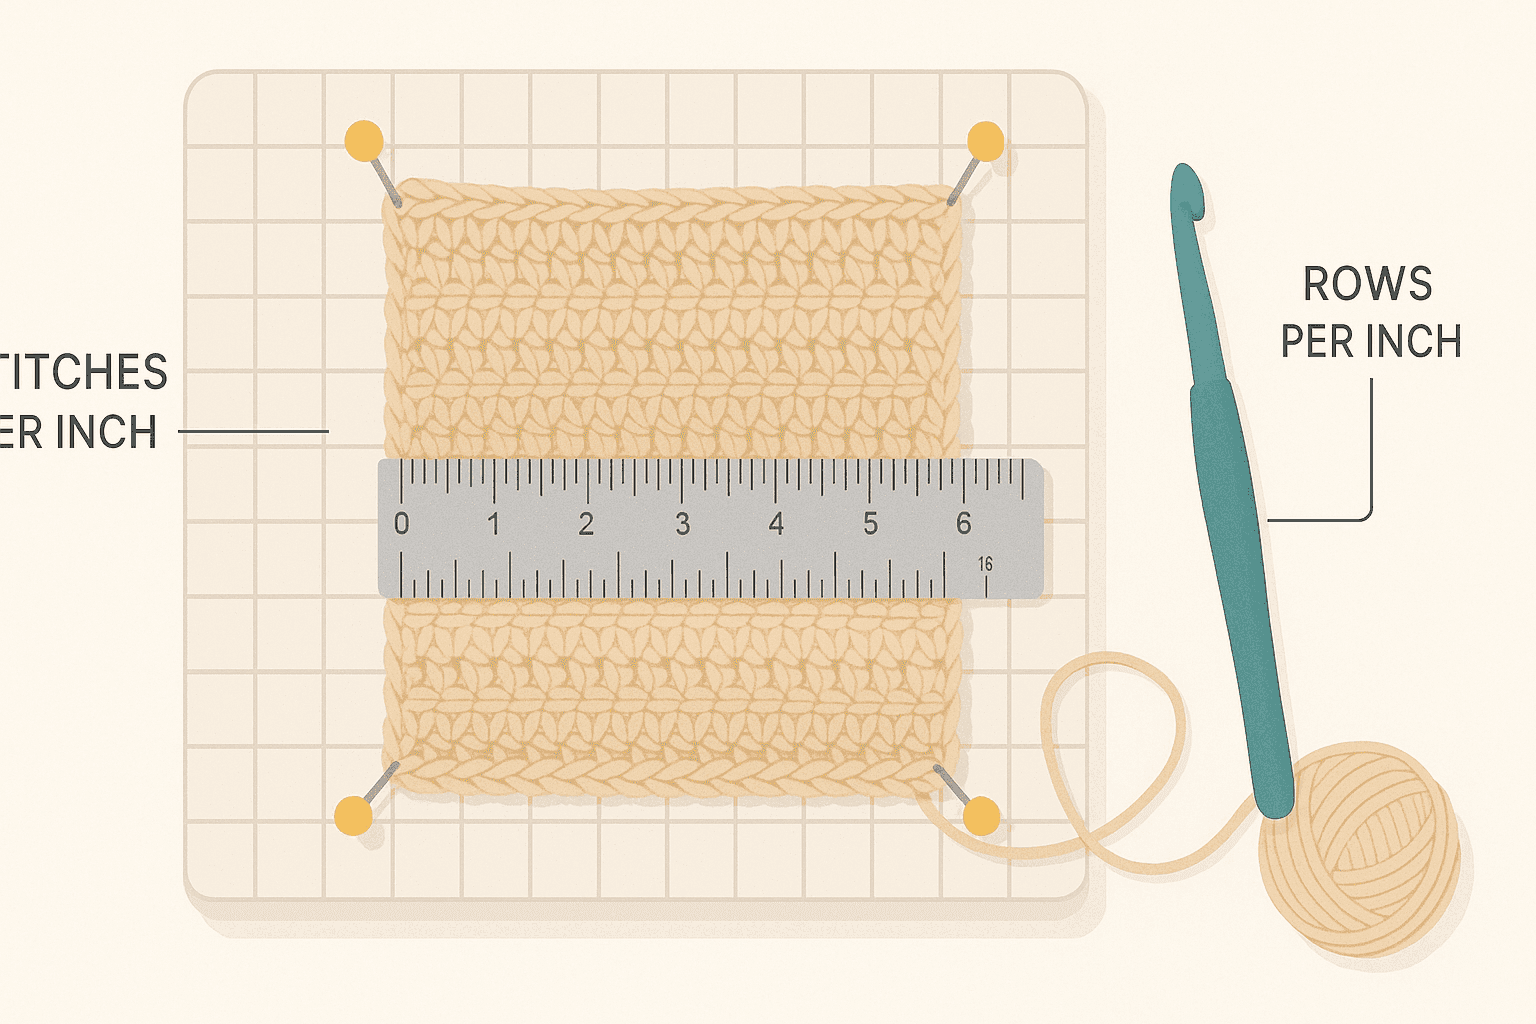
Gauge is the relationship between your stitches and a fixed measurement—typically stitches per inch (or 10 cm) and rows per inch (or 10 cm). It’s the quiet, decisive factor behind whether a sweater fits, a hat slouches correctly, a blanket drapes the way you imagined, or a bag sags into an unintended hammock.
Many crocheters learn early that crochet is “more forgiving” than knitting, and to a point that’s true—crochet fabric can be thicker, more structured, and sometimes less sensitive to tiny differences. But crochet is also highly variable because:
- Yarn path differs by stitch (single crochet vs double crochet changes height dramatically).
- The hook holds a larger active loop, amplifying tension differences.
- Many crocheters unintentionally change tension when turning rows, working in the round, or switching stitch patterns.
If you’ve ever made a garment that came out two sizes too big, a sleeve that’s longer than the body, or granny squares that don’t match… you’ve met gauge.
The good news: gauge isn’t a mysterious talent you either have or don’t. It’s a measurable behavior you can observe, adjust, and stabilize.
What gauge actually is: stitches, rows, and fabric behavior
Most patterns specify gauge in a format like:
Gauge: 16 sts and 12 rows = 4 in (10 cm) in dc (double crochet)
This means that, using the suggested yarn/hook (and the specified stitch pattern), a 4-inch square of fabric should contain 16 stitches across and 12 rows tall.
There are two main gauge components:
- Stitch gauge (width): stitches per inch/10 cm.
- Row gauge (height): rows per inch/10 cm.
For fit-sensitive items (garments, hats), stitch gauge is usually the most critical because it determines circumference and width. But row gauge matters for:
- Armhole depth
- Yoke depth
- Raglan shaping
- Overall length
- Placement of pockets, stripes, motifs
Gauge is not just “numbers”—it’s fabric
Two crocheters can hit the same stitch gauge yet produce different fabrics due to:
- Loop size and tension style (yarn over vs yarn under; tight vs relaxed)
- Hook shape (inline vs tapered)
- Yarn structure (single-ply vs plied, elastic vs inelastic)
- Stitch mechanics (how tall you draw up loops; where you place your hook)
So gauge is also about drape, density, and elasticity. A project that “matches gauge” but feels stiff may not behave like the designer intended.
Yarn properties that influence gauge
Understanding yarn behavior helps you predict gauge changes before you even pick up a hook.
Fiber content
- Wool: elastic, memory-rich. It can “bounce back,” often producing a slightly tighter, springier fabric after blocking.
- Cotton: inelastic, heavier. It tends to grow with wear and can relax after washing. Crochet cotton garments and bags often stretch.
- Acrylic: variable by brand; often resilient and easy-care. Some acrylics relax slightly after washing, others hold shape well.
- Alpaca: drapey and prone to growth; can make garments lengthen.
- Linen/bamboo/viscose blends: smooth, drapey, sometimes slippery. Stitches can lengthen and fabric can bias or sag.
Ply and twist
- High twist, multi-ply yarns: clearer stitch definition and more stable gauge.
- Single-ply yarns: can bloom, flatten, and shift; gauge may change more with blocking.
Yarn thickness and loft
Even within the same labeled category (e.g., worsted/aran), yarns vary. Lofty yarns fill space and may produce fewer stitches per inch than denser yarns at the same hook size.
Hook factors: size, material, and shape
Hook choice is not just the number on the handle.
- Size: obvious gauge lever. Larger hook → larger stitches → fewer stitches per inch.
- Material: slick metal hooks can encourage looser tension; grippy bamboo can encourage tighter tension.
- Shape:
- Inline hooks often produce consistent loops and may feel tighter.
- Tapered hooks may slide more, sometimes yielding slightly larger loops.
If you’re on the edge of gauge, simply switching hook brands can make the difference without changing the labeled size.
How to make a gauge swatch that actually predicts reality
A gauge swatch is only as useful as how closely it mimics your real project conditions.
Step 1: Use the exact stitch pattern specified
If the pattern says gauge is in half double crochet in the third loop, don’t swatch in regular hdc. Stitch mechanics matter.
If the pattern gives gauge “in pattern,” swatch the actual pattern repeat, not plain stitches.
Step 2: Make it bigger than 4 inches
A common mistake is making a swatch that is exactly 4 inches. Edge stitches distort measurement. Instead:
- Aim for 6–8 inches (15–20 cm) wide and tall.
- Then measure the center 4 inches.
Step 3: Work it the way the project is worked
- If the pattern is in the round, swatch in the round (joined rounds or spiral as appropriate).
- If it’s back-and-forth rows, swatch flat.
- If it uses colorwork, swatch with the same colorwork technique (floats, carried yarn, tapestry).
Step 4: Block your swatch like you’ll block the finished item
Blocking can change gauge dramatically—especially with wool (relax and bloom), alpaca (grow), cotton (relax), and lace patterns.
- If the garment will be machine washed, test machine washing your swatch.
- If it will be steam blocked, steam block your swatch.
Let it dry fully before measuring.
Step 5: Measure accurately
Tools:
- A rigid ruler or gauge ruler
- Stitch markers (optional)
- Pins for blocking
Technique:
- Lay swatch flat without stretching.
- Place ruler across the center.
- Count stitches across 4 inches.
- Count rows across 4 inches.
Avoid counting the edge stitches. If your stitch pattern is complex, place two pins 4 inches apart and count between them.
Stitch mechanics: why your tension changes and how to stabilize it
Crochet stitches are built from loops. Small differences in how you form those loops compound over a garment.
Common tension shifts
- After breaks: you come back tighter or looser.
- At the start/end of rows: turning chains and first/last stitches distort.
- In the round vs flat: many crocheters work tighter in the round.
- Different stitch heights: sc vs dc changes hand motion and loop height.
Techniques to improve consistency
- Deliberate loop height: after yarn over and pull through, pause and set the loop height on the hook consistently.
- Mind your “golden loop”: the loop on your hook before completing the stitch determines stitch height. Keeping it consistent stabilizes row gauge.
- Use a tension ring or yarn guide if you struggle with hand strain or inconsistent feeding.
- Take notes: record hook, yarn, and gauge results so you can reproduce them later.
What to do when your gauge is off
You swatched. You measured. The numbers don’t match. Now what?
If you have too many stitches per inch (fabric is too tight/small)
You need bigger stitches.
Try:
- Go up 0.25–1.0 mm in hook size.
- Switch to a hook with a more tapered head (sometimes loosens gauge).
- Focus on loosening the golden loop and not tugging after completing stitches.
If you have too few stitches per inch (fabric is too loose/big)
You need smaller stitches.
Try:
- Go down 0.25–1.0 mm in hook size.
- Switch to an inline hook (sometimes tightens gauge).
- Use a slightly grippier hook material (bamboo/wood) if you tend to overshoot.
If stitch gauge matches but row gauge doesn’t
This is extremely common in crochet.
Options:
- Adjust length by measuring, not by rows. Work to inches/cm for sleeves and body.
- Change stitch height technique. Many crocheters unintentionally make tall dc or squat sc.
- Try a different hook brand even at the same size—hook geometry can alter row height.
If gauge changes after blocking
Then your project will, too. Trust the blocked swatch.
- If cotton grows, consider going down a hook size or choosing a construction that tolerates lengthening.
- If wool blooms and tightens, consider going up a hook size or blocking more aggressively.
Gauge math you can actually use
Gauge becomes empowering when you can do basic recalculations.
Converting gauge to finished width
If your pattern expects 16 sts/4 in (4 sts/in), and your bust circumference target is 40 in:
- Needed stitches = 40 in × 4 sts/in = 160 sts (before any ease/shaping considerations)
If your gauge is 18 sts/4 in (4.5 sts/in):
- 40 in × 4.5 = 180 sts
That’s a 20-stitch difference—enough to change the size significantly.
Ease: the hidden partner of gauge
Garments typically include ease:
- Negative ease (smaller than body): stretchy items like ribbing, some fitted tops.
- Zero ease: close fit.
- Positive ease (larger): relaxed sweaters, cardigans.
If you match stitch gauge but your fabric is less stretchy (e.g., cotton instead of wool), the same ease may feel tighter. Gauge plus fabric elasticity equals real fit.
Pattern examples: where gauge matters most
1) Hats
Hats are circumference-critical. Even a 0.5 stitch per inch difference can be the difference between snug and sliding.
Tip: Swatch in the round using the same stitch and method. If the hat uses ribbing or post stitches, swatch that.
Troubleshooting:
- Hat too small: increase hook size or add rounds/increase count.
- Hat too big: decrease hook size or remove increases.
2) Garments (sweaters, cardigans, tops)
Gauge affects:
- Bust/hip circumference
- Sleeve width
- Yoke depth
Best practice: Choose the size based on finished measurements, then ensure your blocked swatch matches gauge.
If you can’t match gauge: you can still succeed by recalculating stitch counts, but be cautious with shaped areas (armholes, necklines). In those areas, stitch counts interact with geometry.
3) Blankets
Blankets are forgiving on size, but gauge affects:
- Yarn quantity
- Drape and warmth
- Joining and border fit
Tip: If you substitute yarn, gauge changes can significantly change yardage. A looser gauge uses more yarn per square inch because stitches are larger and often have more yarn in the path.
4) Amigurumi
Amigurumi is the exception where you often intentionally ignore pattern gauge to get a tight fabric.
Typical advice: go down 1–2 hook sizes from the yarn label to prevent stuffing from showing.
Key: Consistency matters more than matching a designer’s gauge, unless the pattern includes precise sizing (e.g., outfit pieces that must fit the doll).
Gauge across stitch patterns: why you can’t assume
Changing stitch patterns changes gauge.
- Single crochet is short and dense.
- Double crochet is taller and more open.
- Lace can expand dramatically after blocking.
- Cables/post stitches pull fabric inward, reducing width.
- Moss/linen stitch can be tighter and less stretchy.
So if you plan to modify a pattern by swapping stitch patterns, swatch the new pattern and measure.
Practical tips for better gauge results (without stress)
Use “project posture”
Swatch while sitting and holding yarn the way you normally crochet on a project. Swatching in a rushed, tense posture can yield a tighter gauge than relaxed couch crocheting.
Make two swatches if needed
If you’re between hook sizes, make a swatch with each hook. Choose based on:
- Which matches gauge best after blocking
- Which fabric feels best (drape, density)
Track gauge over time
Keep a note in your project journal:
- Yarn brand/colorway
- Hook size and brand
- Stitch pattern
- Pre-block and post-block gauge
This becomes incredibly useful when you return to a WIP months later.
Beware of the “edge lie”
Edges curl, flare, or tighten. Always measure the center.
Don’t skip row gauge for garments
If the pattern involves shaping at specific rows, row gauge affects where decreases/increases land on the body.
Troubleshooting guide: common gauge problems and fixes
Problem: My swatch matches gauge, but the project doesn’t
Possible causes:
- You crocheted the swatch flat but the project is in the round.
- You blocked the swatch but haven’t blocked the project.
- You changed tension over time (fatigue, speed, stress).
- Your stitch placement differs in the project (e.g., working into back loop only, or through different loops).
Fixes:
- Re-check gauge mid-project with a “live measurement” section.
- Block the piece-in-progress gently and re-measure.
- Use stitch markers to keep edges consistent.
Problem: My gauge changes when I switch colors
Some yarns vary slightly by dye lot; some crocheters change tension with different contrast levels.
Fixes:
- Swatch with the main colors used.
- Keep hand posture consistent.
- Consider changing hook size for the tighter color sections (advanced but sometimes necessary in colorwork).
Problem: My fabric is too stiff at correct gauge
This can happen when you match gauge by using a smaller hook but the designer intended a drapier yarn or stitch.
Fixes:
- Try matching gauge with a different yarn (more drape, different fiber).
- Re-evaluate whether the pattern’s intended fabric is meant to be structured.
- Consider going up a hook size and choosing a smaller pattern size (advanced substitution approach), but swatch carefully.
Problem: My fabric is too floppy at correct gauge
Fixes:
- Use a yarn with more structure (higher twist, plied, wool blend).
- Choose a denser stitch pattern.
- Add structural elements: ribbing, slip-stitch edges, linings (for bags).
Blocking and gauge: what changes and why
Blocking can:
- Relax tension (usually increases size)
- Open lace (increases both width and height)
- Bloom fibers (can fill gaps and sometimes slightly tighten appearance)
Blocking methods
- Wet blocking: soak, squeeze gently, pin to measurements, dry.
- Steam blocking: hover steam over fabric, shape, allow to cool.
- Spritz blocking: mist and shape (less dramatic).
Natural fibers often respond more than acrylic, though acrylic can be “killed” with aggressive heat, permanently changing drape (use caution).
Expert grounding: standards and reliable references
While crochet gauge varies by designer and stitch pattern, yarn standards help you start in the right neighborhood.
- The Craft Yarn Council provides widely used yarn weight guidelines, recommended hook ranges, and standard gauge expectations by yarn category. These are not a guarantee of pattern gauge, but they’re a helpful baseline for substitution decisions.
Designers also typically choose gauge based on:
- Desired drape and density
- Stitch definition
- Wear and recovery
Treat pattern gauge as part of the design, not a random requirement.
A practical workflow for any new pattern
- Read the gauge line and note: stitch pattern, measurement unit, blocked/unblocked assumptions.
- Choose yarn with similar fiber behavior and structure if substituting.
- Swatch bigger than 4 inches using the project method (flat vs round).
- Block the swatch the way you’ll treat the finished piece.
- Measure stitch and row gauge in the center.
- Adjust hook size until stitch gauge matches.
- Decide what to do about row gauge: measure-as-you-go or adapt counts.
- Start project and re-check gauge after 20–30 minutes of relaxed crocheting.
This workflow is slower at the start, but it’s the fastest path to a finished object you’ll actually love using.
Pattern mini-examples you can try as gauge practice
These aren’t full patterns—think of them as controlled experiments to build gauge intuition.
Mini-example 1: Double crochet gauge square
- Chain 26.
- Dc in 4th chain from hook and across (24 dc).
- Ch 3, turn. Dc across.
- Repeat until square is at least 6 inches tall.
Measure the center 4 inches for dc gauge. Block and measure again.
Mini-example 2: Moss stitch (linen stitch) gauge strip
- Chain an even number, e.g., 32.
- Row 1: Sc in 2nd ch, ch 1, skip 1 ch, sc in next repeat.
- Row 2: Ch 1, turn. Sc in first ch-1 space, ch 1, sc in next ch-1 space repeat.
Moss stitch can surprise you: it often tightens width and changes drape compared to dc.
Mini-example 3: In-the-round gauge tube
- Ch 32, join to form ring (avoid twisting).
- Work a few rounds of the pattern stitch (e.g., hdc).
This helps if your flat gauge differs from your in-the-round gauge.
Closing perspective: gauge as a creative tool
Gauge has a reputation as the boring homework of crochet. But once you understand it, gauge becomes a creative lever:
- Want a summer tee instead of a winter sweater? Adjust fiber and gauge for more drape.
- Want a structured tote? Tighten gauge intentionally for stiffness.
- Want a throw that’s larger without rewriting the whole pattern? Use gauge math and add repeats confidently.
When you measure your fabric, you’re not “obeying rules”—you’re learning the physics of your stitches. That’s what turns a good crocheter into a dependable maker whose projects come out the way they imagined.