There is a particular kind of surprise that happens when you hand someone a well-made slip stitch crochet swatch and they pause, turn it over, stretch it sideways, and ask, "Wait—is this knitted?" Most of us meet slip stitch early as a utility move: joining rounds, moving across a row, edging a piece. It seems almost too small to matter. Then one day you work a full fabric in slip stitch—especially through the back loop or along a carefully chosen loop path—and suddenly the stitch reveals its real personality. It is not just a connector. It is architecture.
Slip stitch crochet can build cloth with remarkable density, directional texture, controlled elasticity, and a polished surface that reads far closer to knit than many crocheted fabrics do. It can produce ribs that recover beautifully, planes of fabric that behave like woven bands, compact surfaces suitable for bags and collars, and sculptural pieces where the path of the stitch creates both line and structure. It does all of this without being Tunisian crochet and without relying on the standard beginner rib tutorial of "single crochet in the back loop only until it looks stretchy." Slip stitch deserves a more technical conversation than that.
If you have ever wanted crochet fabric that feels engineered rather than merely assembled, slip stitch is one of the best places to study. The trick is understanding that with slip stitch, tiny changes in pathing, orientation, yarn choice, and shaping strategy create outsized changes in performance. Fabric worked rowwise does not behave like fabric worked in the round. Back-loop slip stitch is not the same fabric as center-loop slip stitch. A merino-cashmere blend will not recover like a springy wool, and cotton slip stitch that looks beautifully crisp can punish your hands if you fight it with the wrong hook. The payoff for getting these choices right is enormous.
Why slip stitch behaves like engineered fabric
Slip stitch is the shortest standard crochet stitch. Because it adds very little height per stitch, the yarn path stacks tightly, drawing loops close together and reducing open space between stitches. In plain terms, you get more yarn occupying less visible area. That is the source of the dense hand and the visual neatness.
But density is only part of the story. Slip stitch fabric also has direction. The loops sit in organized tracks, and whichever loop or bar you choose to enter determines how those tracks align across the surface. This is where slip stitch starts to act less like a generic crochet stitch and more like a system for laying fibers into a fabric map.
Three qualities define slip stitch architecture:
- Compression: stitches pack tightly, creating body and wind resistance.
- Directional stretch: the fabric often stretches more in one direction than another, depending on construction.
- Surface line: loop pathing creates visible ridges, channels, knit-like V formations, or woven-looking horizontal striations.
Understanding these three variables lets you design rather than simply imitate.
Rowwise vs in-the-round construction: the first major design decision
Before you choose yarn or loop placement, decide whether the fabric should be built flat in rows, joined rounds, or continuous spirals. This choice changes grain, elasticity, appearance, and seam behavior.
Rowwise slip stitch
Rowwise slip stitch, especially when worked into a single loop, is often the path to the most knit-like ribbing and directional stretch. When you turn at the end of every row, the fabric develops a strong crosswise elasticity because the columns of loops can expand and contract. This is why rowwise slip stitch is so effective for cuffs, hems, hat bands, neckbands, and fitted edgings.
A common swatch setup:
- Yarn: DK or worsted weight wool or wool blend
- Hook: 0.5-1.5 mm larger than the yarn label recommendation if your hands are tight, or at label size if you naturally crochet loosely
- Foundation: chain 21
- Row 1: slip stitch in second chain from hook and in each chain across, 20 sts
- Row 2 onward: chain 1, turn, slip stitch in chosen loop across, 20 sts
Stitch count stays 20 throughout. Because slip stitch rows are short, counting matters. Losing one stitch at an edge changes the angle and tension of the whole piece surprisingly quickly.
Best uses of rowwise construction:
- Elastic bands and trims
- Faux-knit garment panels
- Cuffs and collars requiring recovery
- Scarves with pronounced vertical line
- Structured yokes where horizontal stretch matters
Slip stitch in joined rounds
Joined-round slip stitch gives a more continuous surface, but the join itself becomes a structural event. Depending on where you place it, the join can form a visible seam line, a design feature, or a subtle spiral break. In compact fabrics for bags, baskets, collars, and fitted sleeves, joined rounds provide excellent stability.
Basic sample setup:
- Chain 36, join without twisting
- Round 1: chain 1 if needed for turning logic, slip stitch in each chain around, join with slip stitch, 36 sts
- Subsequent rounds: work slip stitch into chosen loop around, maintaining 36 sts
Because slip stitch is low in height, joined rounds can bias if the join is not handled consistently. It is worth using a marker in the first stitch of every round.
Best uses of joined rounds:
- Sleeves or cuffs where you want no side seam
- Cowls and collars
- Bag bodies with a stable cylindrical wall
- Hats with compact structure
Continuous spiral rounds
Spiral slip stitch can produce beautiful uninterrupted surfaces, particularly for containers and sculptural accessories. But because slip stitch is so compact, the beginning of round can drift visibly. For highly structured work, that drift can either become a pleasing diagonal grain or an annoying misalignment.
If you use spiral construction, mark the first stitch of each round and check whether increases or decreases are leaning in a consistent direction. For garments, I generally reserve spiral slip stitch for places where the diagonal motion is either hidden or intentionally showcased.
Loop pathing: back loop, center loop, and surface engineering
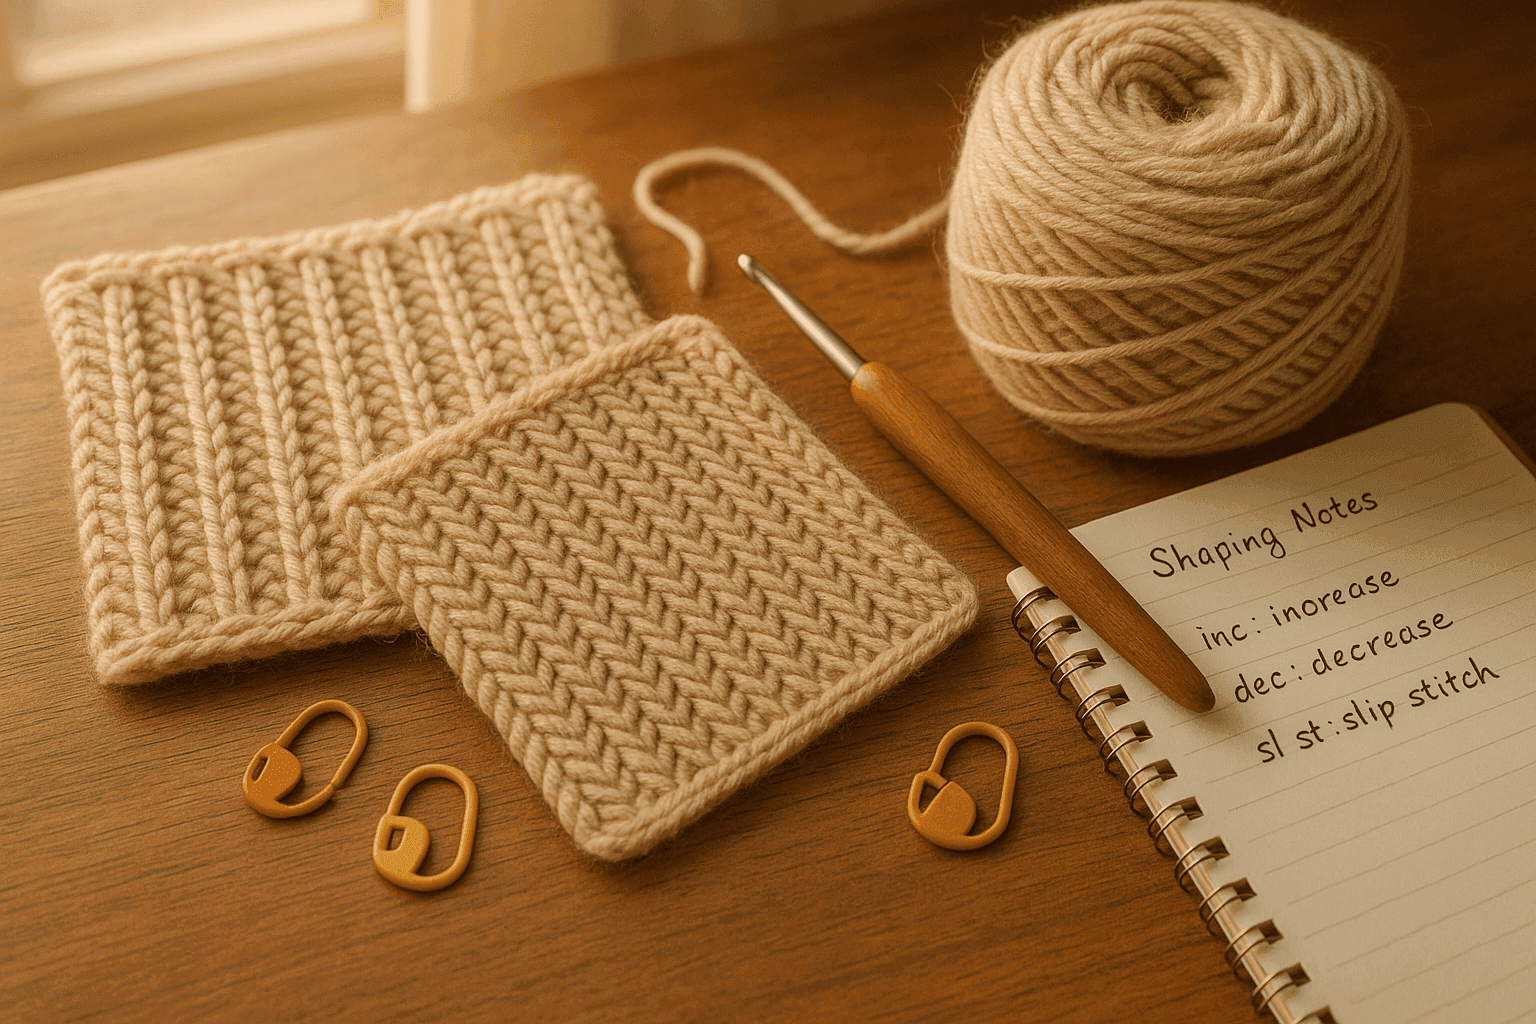
This is where slip stitch turns from a stitch choice into a fabric language. The loop or bar you enter changes elasticity, surface look, and thickness.
Back-loop slip stitch (BLO)
The most familiar architecture in slip stitch crochet is back-loop only. By leaving the front loop unworked, you create a horizontal ridge on the surface and a hinge at every row. This hinge is why BLO slip stitch stretches and rebounds so effectively, especially when worked rowwise.
Characteristics of BLO slip stitch:
- Excellent crosswise elasticity
- Clear ribbed texture
- Soft fold lines
- Knit-adjacent appearance, especially in fine wool
- Slightly less abrasion resistance than full-loop work due to exposed ridges
For cuffs and hem bands, BLO rowwise slip stitch is often the gold standard. A typical cuff might be:
- Chain 13
- Row 1: slip stitch in second chain from hook and across, 12 sts
- Rows 2-42: chain 1, turn, BLO slip stitch across, 12 sts
This gives a cuff approximately 2.5-3.5 inches deep depending on yarn and gauge. Join short ends, then work garment stitches into the row ends.
Approximate gauge range for a worsted wool cuff in BLO slip stitch:
- 22-28 rows = 4 inches
- 14-18 stitches = 4 inches
Gauge varies wildly because some crocheters pull slip stitch very tight. Swatch honestly.
Center-loop or "third loop" pathing
In some slip stitch fabrics, especially when working flat, you can insert the hook into a central horizontal bar or a loop path that sits between the top loops and the body of the stitch. Different designers name these paths differently depending on the orientation of the work, so the best rule is visual: identify the bar that lets the top edge tip forward and stack into V-like columns.
This pathing often creates an even more knitted appearance than BLO, with flatter ribs and a smoother plane. It can also reduce some of the exaggerated corrugation of back-loop work.
Characteristics of center-loop slip stitch:
- Dense, flatter fabric
- More refined, less overt ribbing
- Often slightly less stretch than BLO but more than full-loop work
- Excellent stitch definition in smooth plied yarns
- Strong visual columns
This is a particularly strong choice for garment panels where you want knit-like visual continuity without the pronounced ridges of ribbing. It is also useful for collars that need body without bulk.
Full-loop slip stitch
Working under both top loops increases stability and minimizes stretch compared with BLO. It creates a compact surface suitable for bags, belts, straps, and accessories that need to hold shape.
Characteristics of full-loop slip stitch:
- Highest stability of the common slip stitch paths
- Reduced elasticity
- Dense, almost woven hand in non-stretch fibers
- Good for structural pieces and abrasion-prone areas
If you are making a bag flap or a slim phone pouch, full-loop slip stitch in cotton or linen blend can be excellent. Just be mindful that hand strain rises quickly in non-elastic fibers.
Elasticity and recovery: what slip stitch can and cannot do
Slip stitch can mimic some knit-like behavior, but it does not obey identical physics. The fabric stretches because loops can open and shift, not because the stitch structure matches knit interlooping exactly. That means recovery is highly dependent on fiber, loop placement, and gauge.
Where slip stitch excels
- Short, frequent stretch cycles: cuffs pulled over hands, hat bands, neck trims
- Controlled negative ease: fitted hems, waistbands, close collars
- Surface memory: fabrics that spring back after moderate extension
Where its limits show
- Long-term load: bag straps made in elastic wool may lengthen with wear
- Heavy garments: large slip stitch sweaters can grow if the fiber lacks resilience
- Overstretched openings: if you demand sock-rib levels of repeated extension from a cotton slip stitch cuff, it may bag out
Recovery by fiber category
- Wool, especially springy non-superwash wool: best overall recovery
- Wool blends with nylon: excellent for cuffs, hat bands, and accessories
- Superwash merino: soft and beautiful, but may relax more than expected
- Alpaca-heavy blends: lovely drape, weak rebound for high-recovery applications
- Cotton: crisp structure, limited bounce; use where stability matters more than spring
- Linen: superb stitch definition and firmness, minimal elasticity
- Acrylic: variable; can be resilient, but often lacks the refined memory of wool
Practical recovery test
Before committing to a cuff or neckline, swatch at least 4 x 4 inches. Measure the width relaxed. Stretch it comfortably to what you expect in use, hold 10 seconds, release, wait 1 minute, and measure again.
- If the swatch returns within about 5-8% of original width, recovery is good.
- If it remains stretched by more than 10-12%, reduce hook size, change loop path, or choose a springier fiber.
That simple test tells you more than theory alone.
Yarn and hook pairing: the difference between elegant and exhausting
Slip stitch magnifies yarn behavior. A yarn that feels forgiving in half double crochet may feel stubborn in slip stitch. Conversely, a yarn that seems ordinary in other fabrics can become stunningly tailored here.
Best yarn characteristics for slip stitch architecture
- Smooth or semi-smooth plies for visible surface lines
- Moderate elasticity for easier insertion and recovery
- Good twist to resist fuzzing under repeated hook entry
- Enough body to support dense construction
Recommended yarn weights by project
- Fingering/sport: refined cuffs, lightweight garment panels, elegant collars
- DK: perhaps the sweet spot for garments and accessories; dense without becoming too thick
- Worsted: excellent for bags, cozy cuffs, outerwear trims, and hats
- Bulky and above: use carefully; slip stitch can become board-like very fast
Hook size guidance
Because slip stitch runs compact, many crocheters need to go up a hook size from instinct. But not always from label recommendation. The goal is a fabric that the hook can enter repeatedly without strain while maintaining definition.
Starting point suggestions:
- Fingering yarn: 3.25-4 mm hook
- Sport/DK: 4-5 mm hook
- Worsted: 5-6 mm hook
- Dense bag fabric in cotton worsted: 4-4.5 mm hook for firmness, if your hands can manage it
If you hear the hook squeaking, fight to pull loops through, or notice your shoulders tightening, the fabric is asking for a larger hook or softer yarn.
Surface effects and color behavior
Slip stitch may be compact, but it is not visually dull. The directional structure makes it wonderful for subtle texture and smart color use.
Horizontal vs vertical emphasis
- Rowwise BLO slip stitch: often emphasizes horizontal ridges while the piece stretches widthwise
- Center-loop pathing: tends to create vertical knit-like columns
- Round construction: can produce circumferential lines, excellent for collars and vessel forms
Use this deliberately. A waistband may benefit from horizontal elasticity, while a front garment panel may look more elongating with vertical columns.
Solid, heathered, and marled yarns
- Solid smooth yarns: show pathing and shaping most clearly
- Heathered wool: softens the texture just enough for a refined garment look
- Marled yarns: emphasize depth and can make simple slip stitch look woven
- Variegated yarns: often obscure the surface engineering; use only if color movement is the main feature
Striping and color change strategy
Because slip stitch is short, color changes can look crisp. Fine stripes are especially effective. In joined rounds, jog management matters more because every round is visually compact.
For a tidy stripe in joined rounds:
- Complete the final slip stitch of the old color until two loops remain conceptually controlled.
- Draw the new color through to finish.
- Join the round with the new color consistently.
For flat fabrics, carrying yarn along the edge works only if the edge will be seamed or bordered. Otherwise, the compact nature of slip stitch can make carried floats visible.
Shaping math: increasing and decreasing without losing the fabric language
Shaping in slip stitch is not difficult, but it is less forgiving visually than shaping in taller stitches. Every increase and decrease affects line continuity.
Gauge and planning
Always take both stitch gauge and row gauge. In slip stitch they are often quite different from other crochet fabrics.
Example garment-panel gauge in DK wool, center-loop slip stitch:
- 18 stitches = 4 inches
- 26 rows = 4 inches
That means:
- 1 inch = 4.5 stitches
- 1 inch = 6.5 rows
If you need a bust width of 20 inches per panel in a seamed garment:
- 20 x 4.5 = 90 stitches
If your armhole depth needs to be 8 inches:
- 8 x 6.5 = 52 rows
Because slip stitch fabric can relax after blocking, measure your swatch both before and after finishing.
Increases
The cleanest increase method usually depends on whether the increase will be hidden in a seam, displayed as a line, or distributed invisibly.
Options:
- Edge increase: work 2 slip stitches into the first or last stitch; easiest and ideal for shaping side seams
- Lifted increase into row-end space or side bar: useful for cuffs and bands joined to larger pieces
- Paired internal increase: work 2 slip stitches into one stitch, then on next row keep pathing consistent to prevent a hole
Because slip stitch is tight, internal increases can create a nub if worked abruptly. To soften this, place increases every 4th or 6th row rather than every 2nd if the shaping allows.
Decreases
Slip stitch decreases can become stiff if overcompacted. My preferred methods are:
- Skip-one decrease: especially at edges where a seam can absorb the line
- Slip two together through chosen path: insert through two loops/paths, pull up a loop, pull through loop on hook
- Balanced paired decrease: work one decrease just inside each edge for symmetry
For neckline shaping, edge decreases usually look cleaner than clustered internal decreases.
Short-row and wedge shaping
Slip stitch is superb for wedge-based shaping because the dense rows stack smoothly. This is especially useful for:
- Shawl collars
- Curved hems
- Beret bands
- Bag gussets
Example wedge concept:
- Work 20 sts across for 6 rows
- On row 7, work only 16 sts, turn
- Row 8, work 16 sts back
- Row 9, work 12 sts, turn
- Row 10, work 12 sts back
- Then resume full width gradually
These partial rows create elegant shaping without dramatic holes because slip stitch naturally minimizes gaps.
Seam strategy: structural, invisible, or decorative
Seams in slip stitch are not an afterthought. They can reinforce the architecture or interrupt it badly.
Best seam choices by purpose
For invisible garment seams:
- Mattress stitch through edge bars on blocked pieces
- Best when the surface has visible columns you want to continue across the join
For stable accessory seams:
- Slip stitch seam through both layers
- Excellent for bags, pouches, belts, and firm collars
For low-bulk joins in bands:
- Join-as-you-go slip stitch through foundation chain and last row loops
- Ideal for cuffs and hat bands
Row-end realities
Rowwise slip stitch edges can be visually uneven if the turning chain is inconsistent. Keep your edge method disciplined. Usually a simple chain 1 that does not count as a stitch is enough, but some crocheters prefer turning without chaining for a tidier edge. Swatch both.
If you plan to seam later, build a reliable edge by:
- marking first and last stitches for the first few rows
- keeping the turning chain loose
- avoiding accidental slip stitches into the turning chain unless intentionally used
For picking up stitches along a row-end edge—for example, adding a body to a cuff—use your row gauge math. If you have 26 rows per 4 inches and need a balanced pickup ratio, you may pick up approximately 2 stitches for every 3 row ends, adjusting as needed to avoid ruffling or drawing in.
Step-by-step applications
Here are practical systems for three common uses.
1. Engineered cuff or hem band
Goal: resilient, knit-like rib without knitting or Tunisian.
Materials
- DK or worsted wool blend
- Hook 4.5-5.5 mm depending on yarn and tension
- Tapestry needle
Sample cuff
- Chain 11 for a narrow cuff or 15 for a deeper cuff.
- Row 1: slip stitch in second chain from hook and each chain across. If you chained 11, you have 10 sts.
- Row 2: chain 1, turn, BLO slip stitch across, 10 sts.
- Repeat Row 2 until the strip wraps the wrist, lower sleeve, or hem edge with 10-15% negative ease.
- Join short ends with slip stitch or mattress stitch.
- Work body stitches evenly into row ends.
Sizing math
If your cuff strip measures 0.18 inch per row and you need a 7-inch finished circumference with 10% negative ease:
- target length = 7 x 0.9 = 6.3 inches
- 6.3 ÷ 0.18 ≈ 35 rows
Make 35 rows, test stretch, then adjust.
2. Structured bag panel
Goal: compact, low-stretch fabric with surface refinement.
Materials
- Worsted cotton or cotton-linen blend
- Hook 4-4.5 mm
- Optional lining fabric
Panel setup
- Chain 31.
- Row 1: slip stitch in second chain from hook and across, 30 sts.
- Row 2: chain 1, turn, full-loop slip stitch across, 30 sts.
- Repeat until panel measures desired height.
- Make a second panel or continue around for a pouch.
- Seam with slip stitch through both layers for firm edges.
Expected fabric behavior
- Minimal stretch
- Strong abrasion resistance
- Crisp flap fold if blocked lightly or steamed carefully according to fiber
3. Collar or neckline band with controlled curve
Goal: polished, dense trim that hugs without flaring.
Materials
- Fingering or sport wool blend
- Hook 3.5-4 mm
Method
- Measure neckline opening.
- Swatch rowwise BLO or center-loop slip stitch and determine rows per inch.
- Calculate band length at 85-95% of neckline circumference depending on desired snugness and fiber recovery.
- Work a strip to that length.
- Join strip into a ring.
- Pin band to neckline in quarters.
- Sew with mattress or whip stitch, or crochet together by working through band row ends and garment edge.
If the neckline is curved sharply, distribute pickup or seam tension carefully: more room at front curve, firmer at shoulders, balanced at back neck.
Troubleshooting common problems
Slip stitch rewards patience, but it also exposes sloppy habits quickly. Here are the problems I see most often.
Problem: Fabric is too stiff
Causes
- Hook too small
- Yarn too heavy for the application
- Full-loop pathing when BLO or center-loop would suit better
- Tight personal tension
Fixes
- Go up 0.5-1 mm in hook size
- Choose a yarn with more elasticity or less bulk
- Switch to BLO for more hinge and flexibility
- Pause every few rows and consciously relax the pull-through
Problem: Hands hurt after a short session
Causes
- Fighting dense non-elastic yarn
- Holding working yarn too tightly
- Hook head shape not gliding well through compact loops
Fixes
- Use a smoother hook with a head shape you like
- Increase hook size slightly
- Work in shorter sessions
- Avoid learning slip stitch architecture for the first time in cotton with a tiny hook
Problem: Edge stitches are disappearing
Causes
- Missing the final stitch because rows are low-profile
- Accidentally working into turning chain or skipping it inconsistently
Fixes
- Mark first and last stitch of every row for the first 10 rows
- Count every row until your eyes learn the edge structure
- Use the same turning method every time
Problem: Ribbing stretches out and stays loose
Causes
- Fiber lacks recovery
- Hook too large
- Band made to full body measurement rather than negative ease
Fixes
- Choose wool or wool blend instead of plant fiber
- Reduce hook size slightly
- Recalculate with 10-15% negative ease for cuffs and 5-10% for hems
Problem: Surface looks uneven or bumpy
Causes
- Inconsistent insertion path
- Tension shifts during turns
- Yarn with too much halo hiding the stitch lines
Fixes
- Slow down and identify the exact loop/bar before each insertion
- Block the swatch; many small irregularities settle beautifully
- Use a smoother yarn while learning the technique
Problem: Joining rounds creates a visible jog
Causes
- Slip stitch joins stack in one place
- Color change at join exaggerates the step
Fixes
- Place join at underarm, side seam, or back neck where possible
- Use spiral rounds if the project can tolerate drift
- Consider faux-jogless techniques by adjusting first stitch placement after the join
Variations worth exploring
Once you understand the core architecture, slip stitch opens into many design directions.
Alternating loop paths
Work two rows BLO, then two rows center-loop, and you will get a subtler corrugated fabric with alternating bands of stretch and stability. This is excellent for modern cuffs and minimalist scarves.
Integrated color bands
Use narrow 2-row stripes in rowwise slip stitch to emphasize the horizontal grain. In center-loop fabrics, use tonal shifts instead of high contrast for a tailored look.
Slip stitch with strategic taller-stitch zones
A fully slip stitched garment can be heavy. One elegant solution is to use slip stitch only where architecture matters most:
- cuffs n- hem bands
- front bands
- collar stands
- pocket welts
- bag bases and straps
Then pair with half double crochet, linked stitches, or other denser body fabrics elsewhere. The contrast often improves both wearability and design clarity.
Bias-oriented panels
Because direction is so visually important, panels worked in different orientations can create striking geometry. A bag with a horizontally ribbed front and vertically ribbed side gussets feels intentional and expensive-looking.
Folded double-layer structures
Work a slip stitch strip twice the desired depth and fold it to create a doubled cuff or stand collar. The inner and outer layers trap warmth, improve recovery, and give exceptional polish.
Finishing methods that preserve the fabric
Dense fabric can be ruined by careless finishing. Slip stitch especially benefits from restraint.
Blocking
- Wool: wet block gently, do not overstretch the ribs
- Cotton/linen: steam lightly or damp block to shape, avoiding flattening all surface texture
- Acrylic: use extreme caution with steam; too much heat can kill elasticity permanently
Always let the fabric rest fully dry before measuring final dimensions.
Edging
Slip stitch fabrics rarely need fussy edging. A simple crab stitch, plain slip stitch edge, or narrow single crochet border is often enough. Too much edging can overwhelm the clean architecture.
Lining and reinforcement
For bags and structured accessories, a lining can prevent stretching and abrasion from the inside. For garment necklines and button bands, a sewn-in ribbon or twill tape can stabilize openings while leaving the slip stitch surface visible.
Buttons and closures
If attaching buttons to slip stitch fabric, sew through multiple yarn paths, not just a surface ridge. Dense fabric supports buttons well, but repeated strain on one exposed loop can cause distortion.
Design takeaways: thinking like a fabric engineer
When you treat slip stitch as architecture rather than filler, design decisions become clearer.
Ask these questions at the start of a project:
-
Do I need stretch, stability, or a balance of both?
Use BLO rowwise for stretch, full-loop for stability, center-loop for refined balance. -
What direction should the fabric visually travel?
Vertical columns lengthen. Horizontal ridges emphasize width and rhythm. Round construction wraps the form. -
How much recovery does the project require?
Match high-recovery jobs with springy wool. Reserve cotton and linen for structure-forward pieces. -
Where will shaping be visible?
Place increases and decreases where they support the line of the garment or hide within seams. -
Will the seam help or hurt the design?
Choose mattress for invisibility, slip stitch seams for strength, and intentional join lines when you want architectural emphasis. -
Can slip stitch be used strategically instead of everywhere?
The most successful projects often deploy it where its strengths matter most.
Slip stitch crochet is slow compared with taller stitches. There is no point pretending otherwise. But slowness is part of why the resulting fabric feels deliberate. Every row contributes subtle strength. Every loop path adds direction. Every fiber choice changes the engineering. It is one of the best techniques for makers who enjoy the conversation between hand, tool, and cloth.
If you have only used slip stitch to join rounds or edge a neckline, try giving it a real assignment. Swatch one yarn in BLO, one in center-loop, one in full-loop. Pull them sideways. Hang them overnight. Seam them. Block them. Watch how they behave. Very quickly, you stop seeing slip stitch as the smallest stitch in crochet and start seeing it as one of the most sophisticated.
That is when it becomes not just a technique, but a design material in its own right.